Monday, December 6, 2010

BROWN: ELEVEN Hiking adventures thus far

My initial checklist for things to do when arriving to Hawaii included "Hike Diamond Head" to which I have done twice now and plan on hiking it several more times, but I did not realize the vast amount of trails for hiking there would be here. I guess I should have figured as much, but to my delight I have found there are so many.  I love hiking.  My mom, sisters and I used to hike/run Percy Warner and Edwin Warner Park(two parks in Nashville that backed up to our neighborhood).  I have to say we used to tear those trails out! My mom always explained her love for the trails, saying that you never get board with them unlike working out at the gym. There were so many to choose from, and depending on the amount of mileage you wanted to travel that day, to whether you wanted a rugged trail or a smoothed paved trail, were daily choices to change things up.  I have to admit that I have sprained my ankle three times running the trails over the years, and that is one danger, but its worth the adventure and high you get after a successful completion.  After leaving Nashville for college and then on to Ft. Knox I really missed the trails.  I never liked going to the gym, the years of exercising outdoors really spoiled me, and commitment of going to the gym lasted only months at a time as I would get too bored.
   Andrew and I still have many trails to discover, one of which leads to a beautiful waterfall ( don't worry I will be sure to blog about that one!)
   Diamond Head is a crater created from a volcano which erupted/exploded thousands of years ago.  What remains is a huge crater. In the pictures you can really see the remains of the crater and where the cone shaped volcano used to be. Here are some pictures I pulled from the internet and the rest were taken from me.  The view from the tops makes the whole hike completely worth it!!


Kealia Trail-North Shore


Andrew told me he and his men went on this trail on the north shore and the view from the top was amazing so he would like to take me sometime soon.  I was very excited, but had NO IDEA what I was getting into! Haha! Lets just say it was very, very, very difficult, and I did not think I would make it at times, but it was worth it! We went on a Saturday morning and although Andrew was off work there were several platoons out there in their full gear hiking up and back down. The hikes are a great way for the soldiers to train.  After about 15 minutes of hiking, we were already above several air planes and glider planes (small ones) and took a break to watch them fly around.  We passed several platoons, which was intimidating for me at first but then one of the leaders of the platoons spotted me and asked Andrew, "Is that a girl?" Andrew said, "Yeah, that's my wife" and he said, "Wow, you need to give her a pat on the back." So I was proud of myself that I not only kept up with Andrew, but I was hiking a difficult hike used to train the soldiers.  We also passed a platoon on the way up....Andrew was flying and was not about slow down from me so I had to keep up.  When we reached the top we were 2,000 feet above sea level and by the time we got back down to the bottom we did a total of 6 miles in 2.5 hrs.  The way down was just as hard as the way up if you can believe that because of how steep it was. Every hill we went down we talked about what a great ski slope it would be and how much we would love to snowboard down it... (that's how steep they were!)  Needless to say, I told Andrew although I enjoyed it, it would be a while before we tackled that trail again.
After the hike we had a picnic on the beach and I snorkeled ( Andrew thought the water was too cold so he didn't get in.....baby!!) And then we both PASSED out on the beach. 

 Love, BROWN

Sunday, December 5, 2010

RED: Lily Glass Photography [dot] om: TWELVE

FINALLY! If I could scream through the interweb, I would! I've been doing jump-dances all day - it feels so good to finally be finished with my website. I've needed one for, oh, more than a year... but had so many great weddings this summer and very little time to do anything else but shoot and edit (which I loved!). But alas - the time has come to be able to pass along a real dot.com website and I am so excited. So please, drop by the site, look around and then spread the word!


At the risk of sounding like a bad award acceptance speech: First, thank you to all the beautiful people that allowed me to work with them this summer - here's to years of yummy home-cooked meals and new opportunities. Most importantly: my sweet husband who put up with hours of my scrunched face scowling at the computer screen, my disgruntled mornings waking up from HTML dreams, panicked screams when the website disappeared for hours, called his web-genius friend, Daniel, when I couldn't figure out the menus... and of course he proofread the entire thing. He's selfless and wonderful and I don't know what I would do without him. Thank you, Benny.

Friday, December 3, 2010

RED: 8mm Movie Projector: ELEVEN

One of my mom's friends is a professional Ebay buyer and seller - when she saw our 8mm video on facebook she immediately contacted me, generously offering us this beautiful vintage 8mm video projector! I picked it up when I was down in Tennessee last and I think Ben was more excited about the projector's arrival back to Ohio than my own. After a bit of scrubbing and technical trial and error, Ben had turned our living room into a 1950's family vacation presentation. It's so much fun to watch the film; the only sound in the room is the sputtering of the projector as the film feeds through, frame by frame. There is an inevitable feeling of nostalgia and contentment as you view the world you know so well captured in such a unique and genuine way.


We're headed back to NYC in a few weeks and can't wait to try our 8mm film in the Big Apple!


Wednesday, December 1, 2010

BROWN: TEN Pineapple Garden

After visiting the Pineapple Plantain several times I decided to grow my own pineapple! We live exactly 3 miles from the Plantation ( I know this because I have biked there and back a few times).  Although it is one of the tourist attractions on the island, I still like going there and enjoying the pineapple ice cream (which is the only flavor they make:) and it is delicious!)


After riding the train, walking through the garden, or finding your way through the worlds largest maze, there is lots of shopping to do inside the plantation.  Its not what you would think of a typical plantation, but it's very nice for a "day date" or lunch. 


So first things first, to grow a pineapple you must buy one. 


 Make sure the pineapple is a good shape, and that the eyes are all even around the fruit.  Color does not matter when it comes to a pineapple. No matter if it's green or yellow, once it is picked it is at its ripest so the sooner you  eat it the better it will taste.  Unlike bananas that ripen as they sit on your counter, a pineapple is picked at its ripest and will get no riper, only start to ferment, so eat up!


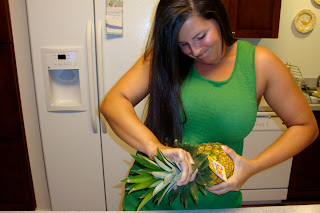
Instead of cutting off the top like you make have done in the past, simply TWIST off the top, do not cut it off that is where the roots will start to grow for planting.


Then tare off a few layers to expose more of the bottom of the pineapple top.


Then put it in a warm sunny place in water. ( you can add water, but don't change the water)


Three weeks later you will have roots like these!! WOW!


Then all you have to do is plant and water every other day.


Pineapples like it really hot and sunny, so if you are trying to gown one on the mainland, start in the summertime and bring your potted pineapple inside when it starts to get cold. My dad is trying to do that in Nashville, so ill update on how both of ours are doing.  The only bummer about this process is it takes 18 months to grow a pineapple, but each plant produces three pineapples.  Here is a picture of a baby one!
So eat up!!!!!!!
Love, BROWN

Monday, November 29, 2010

BROWN :NINE Our first THANKSGIVING!!!!!

( Andrew cut off my head in the picture...how dare him!)
Thanksgiving means lots of people and lots of food....right? Andrew decided to invite his Platoon over for Thanksgiving at our house.  He figured the break is too short for people to go all the way home and most of the guys are young single guys......so instead of them opting for Taco Bell or McDonalds we decided to have them over for a good traditional Thanksgiving dinner (which if I actually told Andrew we could eat there for Thanksgiving he would most likely run around the our loop screaming with joy). I got all the recipes that I love from Connie, and Andrew and I went shopping for everything....and then I started cooking!!
 Here is our table setting for the big day.


The menu:
      Turkey (My dad says it usually takes a few Thanksgivings to get your turkey good and I have to say this was the best turkey I have ever eaten...the white meat was just as juicy as the dark, and the dark just fell of the bone!)
      Ham
      Stuffing
      Cheesy potato casserole
      Sweet potato casserole
      Corn casserole
      Green bean Casserole
      Cranberry sauce
      Gravy
      Rolls
Dessert:
Apple Pie
Fudge Pie
Cheesecake with Chocolate Ganache (which was gone by the end of the day)


Everything was homemade and everything was delicious.  They guys came hungry and left full...they were all very sweet and it was a great day!!
Happy Thanksgiving!
Love, BROWN


BROWN is so proud to be an army wife.

I have to brag on my Andrew for a moment.  Here in Hawaii, he completed RSLC. Here is a short description of what the course entails
                           https://www.benning.army.mil/usmc/courses/course_rslc.htm


The Reconnaissance and Surveillance Leader Course is designed to train leaders of the Army Long Range Surveillance teams that conduct reconnaissance / surveillance at the Division / Corps level.  The course develops the technical, tactical, and leadership skills of selected officer and enlisted personnel assigned to LRS, SF, and heavy/ light division scout and reconnaissance platoons by requiring them to perform hands on tasks, as well as several written examinations.  The RSLC student performs as a team member in a realistic tactical environment under mental and physical stress, approaching that found in combat.  It provides the student the opportunity to refine his leadership and tactical skills to a high degree of proficiency so that he can return to his unit and train his team members.
The course lasts 33 days and pushes the student physically and academically.  The training day lasts an average of 16 hours, 7 days a week.  It is divided into major instructional blocks consisting of Long Range Land Navigation, communications, intelligence, vehicle identification, survival, and operational techniques (planning E & R, hide/ surveillance, photo imagery, airborne, air assault, Fast Rope, and special insertion/ extraction operations).
At the beginning of the course, students will take an Army PFT, Combat Water Survival Test (CWST), and a written land navigation test.  Students should be proficient on written and practical application skills for land navigation prior to arrival.  During the first week, students will conduct their day / night land navigation exercises.  PT is conducted regularly and includes a circuit course and a ruck run.  Students should prepare themselves academically and physically. 

Needless to say, Andrew was amazing. I am so proud of him for getting through this course and all the other ones he has completed.
Signed, BROWN

Brown: EIGHT How to make a cushion

Let me just tell you I am a bargain hunter just like my mother!! ( But to tell you the truth, Lily and Claire are super bargain hunters as well).  I knew I wanted a wooden outside bench for my little front porch but being in the army, not knowing what your next house will look like, it would be silly to buy a new bench only to have to get ride of it for our next move.  Sooooooo, I found a bench for 25$ at a thrift store and all I needed to do was make a seat cushion for it....super easy! So I got my fabric to match my house (green) and used burlap for my accent pillows ( Lily and Claire know my love for burlap).

So start by measuring the seat of your bench and give yourself extra room because when you go to stuff your cushion, it becomes becomes shorter.  Sew the fabric like you would a pillow inside out, leaving some room for your hand to stuff with.  Then turn your cushion right side out and make some stitches where ever you want your cushion to be sectioned off or break, but remember your have to get your hand in all the sections to put stuffing, so leave room:)

Then stuff your cushion section, by section, making sure they are all even.

Then sew up the back part that you left open. I attached ribbons so I could tie it to my bench for wind.

Make some accent pillows and enjoy!  You could also do this for a desk chair or even your dinning/kitchen table chairs!

Love, BROWN

Brown: SEVEN How to make fabric Napkins!

There are SO many ways to make napkins, but I am going to show you how I make mine.  First of all I must share with you my trouble with the fabric stores here on this island.  I have found one fabric store, and although it is very large and well priced, it is hard to get away from the "aloha" patterns :)  So I have found a website that is WONDERFUL! Its fabric.com and that is where I got my fabric for my napkins, curtain, and many other little projects.

So to start I cut my napkin to size.  Standard napkins sizes are 12, 14, and 16 inches, I made mine 16 because that used the most out of my yards of fabric.  So first you must cut your fabric in to a perfect square. Make sure to use a straight edge:)


Then pick a color of BIAS TAPE that compliments your napkins( which is just fabric cut and folded perfectly....you can always make your own) .  You can find bias tape at any craft store.


Simply pin the bias tape over all four edges of your napkin.


Sew.

And place on your table.  As each holiday occurs, make a new set of napkins so in a year you have napkins for every holiday!

Happy Sewing!
Love, BROWN

Tuesday, November 2, 2010

BLONDE: Making A Pillowcase Dress: SIX

A couple of weeks ago we all took a family picture. This was the first professional picture we had taken since Blake and I got married and Annie (my niece) was born. My sister could not find a dress so I was inspired to make one instead. Which lead into me finding a new hobby! These are pillowcase dresses. I just made mine out of different fabrics that I found at Hobby Lobby. I found many different patterns online so if you just Google "pillowcase dress patterns" you can find quite a few. Or if you want me to make you one I can do that too! These are great inexpensive gifts for Christmas or Birthdays that you can make right at home!


.... BLONDE

Monday, October 25, 2010

BLONDE: Redecorating Room A :FIVE

Living in a dorm room has been challenging at times to find a place to put everything. I wanted a dining room that felt like a dining room. Not just a table part of our kitchen or living room. I wanted this dorm room to feel like home. This summer started my mission to make Room A a dining room. Finally, after having our girls' trip I was able to find all the missing pieces to make the room come together. Missing in the picture is my new place mats.


BEFORE- AFTER


Lighting-Ikea
Vases-Potterybarn
Placemats-Potterybarn
Jars-Rose (Brown)
Plate and cups-Lily (Red)


......Claire


RED: 8mm Movie: TEN

Like the majority of 20-something year old couples, Ben and I are aching to explore Europe together. Our refrigerator proudly displays a crumpled piece of notebook paper which was the product of a late night dinner with friends during which we decided upon 5 European countries we would like to visit the most. If all goes according to plan, one year from now you will be reading the most exciting RED post yet - a detailed description of a four week Glass Family European Journey. 

You should not be surprised that during one of our first planning sessions, the subject of photo documentary devices was brought up (i.e. "we need to set a limit on the number of cameras you would bring, Lily").  I don't need to tell you that my brain immediately began strategizing a way to fit my two polaroids, two brownies, two 35mm, digital cameras, my three favorite lenses, and enough film for four weeks into the most efficient bag possible. Ben saw right through me and intercepted my blueprints with "Two or three. Max." Uuuhhh arrow through the heart. You know we're talking about Europe right?! It's not fair that his craft simply require a pencil and a piece of paper...

As I created a mental pros and cons list for each camera, we started talking about how great it would be to have a motion recording of this fantastical adventure. One hour later, a Kodak Brownie 8mm movie camera was purchased on Ebay. (I know what you're thinking - that boots out one of my still cameras. But once you watch the treat below, I'm sure you'll agree that it's more than a fair trade). 

Ben did some research and found the film we needed and a lab in Kansas that processes and transfers the footage into digital files. We ran two test reels and he edited the video into what you see below. My first thought after watching the video? "Our grandkids are gunna think we're so cool."

I can't begin to tell you how excited we are to take this little treasure to Europe with us. Can you imagine the Swiss Alps on this film?! I can't think of a better souvenir. 


Sunday, October 24, 2010

RED: New Lily Glass Photography Packaging: NINE

Watch out - L. Glass Photography is gettin' swanky with new photo disc packaging and personalized labels. Take a peak at the new look here. Or better yet, schedule a photo appointment and receive one of your very own! Every photo session receives a disc with edited images and the shared rights to make prints to your hearts desire. More upgrades to come!

Thursday, October 21, 2010

BROWN: FOUR: BAKE SALE, YUM!


Before we left for Hawaii, 
Family Day for 2-81 AR in Alpha Company back at Ft. Knox called for a good ole bake
sale. The wives decided to host a bake sale to raise money for our FRG: Family Readiness Groups.  Family day brought people from all over the country to spend time with their soldiers during their basic training. In fact, I directed a family to the bathroom and in conversation found out they drove all the way from the Florida Keys - Wow! So in preparation, I made several batches of cookies,
cupcakes, brownies, and a cake! My kitchen was a mess and my mixer was tuckered
out. Nevertheless, we set up that day and had great success. Solders who were
prohibited by their drill sergeants from sweets for months and months had loving
mothers who wanted nothing but to spoil their "babies." So we were able to satisfy the sweet tooth of many hardworking soldiers!